lighting in photography

A beginners guide to lighting in photography

Lighting in photography is key, in fact it is in the name – The etymology of the word ‘photography’ supposedly dates back to 1839 when it was coined by the British scientist Sir John Herschel. ‘Photography” comes from the Greek words phōtós, meaning “light”, and graphê meaning “drawing” or “writing”, and so “photography” literally means drawing with light.

Lighting a subject or scene is often one of the most difficult hurdles to overcome for many photographers and filmmakers. I’m Calum Morrison and I’m a photographer based in the UK and in this blog we will cover the different sources of light, light quality, different lighting styles, and some technical lighting points to help you get on your feet. A lot to get through so let’s jump into it.

So here is a, not so brief, insight into the fundamentals of lighting in photography.


Sources of lighting in photography

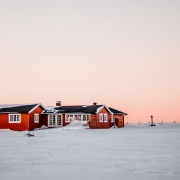
There are two sources of light, natural light and artificial light. Natural light produces a full spectrum, meaning it contains all the colours of ‘visible light’ in the electromagnetic spectrum, while also being dynamic – as the light’s colour and intensity change throughout the day.
Whereas, artificial light emits a static spectrum, as their mix of colours cannot change with time, which is why many artificial light sources are designed to replicate either daylight or evening light.

  • Examples of natural light sources: Candles. Stars. The Sun
  • Examples of artificial light sources: Televisions. Light Bulbs. LED lights

Fun fact: Unbeknownst to many, the Sun isn’t actually yellow, it’s white. It only appears yellow as Earth’s atmosphere scatters the visible colours. Due to the frequencies of red, orange, and yellow they are less easily scattered, which gives the sun it’s yellowish appearance in the day, and reddish hue near the horizon.

Light quality

Both natural and artificial light are capable of producing 4 types of light qualities. Hard light, soft light, specular light and diffused light. Differentiating these can be tough for the untrained eye, but once you know how to identify and replicate them, you’re on your way to mastering the medium.

Hard and soft light

Identifying hard and soft light lies in the subject’s shadow. Anything illuminated by hard light will cast a dark and well defined shadow. A soft light has the exact opposite effect, producing a softer, more muted shadow.

Specular and diffused light

These terms are at the end of a spectrum which refers to how light falls upon the subject, rather than the characteristics of the shadows created by the light’s presence.
At one end of this spectrum we have Specular light. This typically results in high-contrast images with strong highlights and shadows. At the other end is Diffused light. The defining attribute here is an even spread of light which leaves each part of the subject evenly lit.

Many photographers use ‘diffused light’ and ‘soft light’ interchangeably, but there is a nuance difference, and for good reason. Soft and hard light refer only to the lights effects on the subjects shadows, whereas specular and diffused refer to how the light falls on the subject. Diffused light can be created by increasing the surface of a light source; for example, a Softbox scatters the rays and disperses them more evenly on the subject. As such, they often create circumstances that are beneficial to softer light. However, the distance of the source from the subject plays an important role in the quality of light – The farther the light source is placed from the subject, the harder the light will become. Therefore it is very possible for a diffused light source to cast hard shadows.

Styles in lighting in photography

The possibilities are endless when it comes to lighting in photography, and the best way to learn your preference is through trial and error. Nevertheless, knowing some of the most commonly referenced styles could only help. I’m going to briefly go over the following styles:

  1. Flat Light
  2. Side lighting
  3. Backlight
  4. Rim Light
  5. Butterfly Light
  6. Loop Light

Flat light

The light source faces directly towards your subject. In other words the light is directly behind the camera and directed at the subject. Flat lighting in photography will result in your subject being well lit with no visible shadow. This style isn’t heavily desired in certain fields such as portraiture or product photography as shadows are a useful tool when making a piece of art. (Richard please link the ‘Elements of Art’ article here)

Side-lighting

  • Broad Light —The face of your subject is at an angle and the most well-lit side of the face is closest to the camera, subsequently the shadow falls on the back side of the face. This type of light can make a face look fuller and is therefore ideal for those with narrower faces.
  • Short light — This is the opposite of broad light – the face is at an angle and the shadow falls on the side of the face closest to the camera. This type of light works well to thin a face and is flattering on most people. One thing to keep in mind is that shadows draw out textures and imperfections, such as acne and/or scars. With that being said, it is important to communicate with your subject to understand how they feel about this.
  • Split light — Level to the subject light that hits the side from a 90 degree angle. Consider carefully the subjects you use this lighting on as it evokes masculine traits.

Backlight

It is in the name, lighting the comes from behind your subject.  Resulting in a silhouetted image of your subject, which may or may not be desirable. If you wish to counter this, reflect some of the light back onto your subject to add some filler light.

Rim light

Also known as ‘Hair lights’ or ‘Halo lighting’, a Rim light is stationed behind the subject to expose an outline of the subject which gives a dynamic and mysterious effect.

Butterfly light

A specific lighting type for portraiture. The name ‘butterfly light’ comes from the shadow created under the nose of the subject. This style is often used on female subjects to highlight prominent cheekbones, however, this lighting also emphasises the shadows under the eyes so choose your subject wisely. Simply place the light above and in front of your subject and shoot away.

Loop light

A loop light is a light source placed 45 degrees from your subject and slightly above eye height. This style is flattering to practically everyone and has very few negatives. It is a go-to for many photographers.

Technical points

Now you know what lighting is, where it comes from and how you might use it, we’re going to talk about how to go about achieving the results you want. Specifically: Equipment.

If you’re just about to invest in lights, the first thing you want to ask yourself is “is it portable?”. Studio based photographers will require different equipment than photographers who need to travel light, and travel far.

Depending on your needs, you will need to decide between continuous lighting and strobe/flash lighting. Put simply, strobe lights let out quick bursts of light, whereas continuous lights are on all the time. Continuous lighting is necessary for shooting video and beneficial for beginners who want to see how the light is effecting the subject in real time. However, continuous lighting is less powerful than strobe lighting, and therefore more ambient light will be in the final frame. On the other hand, strobe light photography requires more experience, but you end up with more control over the light on your subject.

Strobe lights and continuous lights can come with some serious wattage behind them, meaning the light emitted is very hard. Generally speaking, photographers will use a number of modifiers to diffuse the light. Here are your options:

  • Softboxes or diffusers: If you don’t know what type of light modifier to get, get a softbox or diffuser, they are great in any situation. Commonly white in colour, softboxes and diffusers are translucent pieces of material that spread the light more evenly across the subject.
  • Umbrellas: A shoot through umbrella is a type of diffuser, similar to the look of a softbox. You use it by aiming the light away from the subject and into the umbrella which in turn sends a more concentrated beam of light back to the subject.
  • Beauty dish: Most often used in portraits in fashion, a beauty dish creates a more vibrant light than a softbox, but doesn’t have the same extreme, hard shadows of a naked light.
  • Barn doors: By placing doors or panels on all four sides of the light source, you have a range of possible ways to illuminate your subject. Highly versatile and fun pieces of equipment to play around with.
  • Grids and snoots — These focus the light down to a smaller area. The light hits the subject then quickly falls off to leave the rest of the scene dark. Great at highlighting certain areas of a scene and directing the audiences eye.
  • Gels — Gels give the light source colour. A thin transparent sheet of plastic which come in many different colours. Gels work by allowing light of the same colour through – so if you have a blue gel placed over your light source, only blue light will pass.

There you have it. A beginners guide to lighting in photography. Although, the undisputed best way to learn how to light photographs is by practicing – which is to say you just wasted 3 minutes reading this when you could have been finessing your craft. So go experiment, test our ideas and analyse what you could be doing better. Happy shooting.

professional photography

A list of reasons why your business needs professional photography

No matter the industry, using professional photography and video content across your website, social media and other digital channels catches the reader’s interest, and improves your visibility and consistency online.

Professional photographs are one of the most worthwhile investments one can make for their business: Visitors are 80% more likely to engage with content if it’s paired with an image, and 64% more likely to remember what they read.

Images are essential to a business, and you have a few options to get them:

  • Use stock images
  • Take them yourself
  • Hire a professional photographer

If budget is the priority for you, I would recommend one of the first two. However, if your priority is getting more leads, engaging with customers, or increasing brand awareness, hiring a professional is your best bet, since original photography is far more authentic and successful in achieving those goals.

List

If you don’t have long to read the full list breakdown, here is a short overview of the reasons to hire a photographer:

  • Brand Identity
  • First Impression
  • Authenticity
  • Customer Engagement
  • Consistency
  • Competitive Edge
  • Quality
  • SEO
  • Versatile Assets
  • Knowledge
  • Convenience

In more depth:

Brand identity

Imagery is an indispensable part of your brand and how your business communicates itself to the public. Your imagery gives you the chance to showcase your brand’s personality. Additionally, it shows people you are serious about quality and professionalism. Your photos represent your brand. Low quality, unprofessional photos on your website will communicate the same about your products or services.

First impression

Images on your website and social media are often the first impressions of your business. Your website and social media channels are the first places potential customers are going to find you, and you want to leave a good impression. Seriously, we humans are suckers for anchoring heuristics (AKA focalism.) – This refers to the human tendency to accept and rely on, the first piece of information received before making a decision. That first piece of information is the anchor point that sets the tone for everything that follows. In other words, you really want to leave a good impression, and professional photography does just that.

Authenticity

People connect with people, so using photos and videos of your actual staff, office, and business gives customers a chance to form a connection with you before you’ve ever met. This cannot and should not be overlooked, especially in the professional services industries where trust and connection are important to retain customers. You could always use stock photos, but because they don’t show your actual product or service, it won’t come across as authentic.

Customer engagement

With social media now an essential part of consumer/seller interaction, audience engagement is of the utmost importance. However, be careful as there is a clever way to do this. Some photographers will not be aware of the psychology behind photography which allows for that authentic and genuine feeling. In this instance, you may receive a product that leans into the ostentatious nature of social media. Needless to say, that is not good. So, EVALUATE YOUR PHOTOGRAPHER!

Consistency

Consistently in your pictures will help your online brand grow and reach more prospective customers naturally. Brand guidelines really help us, photographers, with this as we get a clear understanding of your values, who you are, and your aesthetics; fonts, logos, colour scheme etc.

You will be surprised by the impact of having a consistent and memorable social media presence. Your reputation as a business can spread as quickly as wildfire, and people will remember you for the quality of your posts. Play the long game.

Competitive edge

Now that digital marketing has cemented itself as an integral part of modern business, we must accept that content is key. A sleek, aesthetically pleasing and content-driven website will generate a much higher return on investment (ROI) than a simplistic homemade one. Having exceptional photography next to all of your product descriptions will greatly enhance your site traffic, this will be palpable.

Professional photography can be the difference between someone clicking your Ad on Google, engaging with your social media or enquiring through your website. It can lift the quality of a business more than you know, which translates to higher quality services and higher quality customers. Be consistent in your aesthetics, values, brand imagery, linguistics and so on. Professional photography will be key in standing out above your competition

Quality

“Pictures are worth a thousand words.”
We are simple creatures, we often make decisions simply because something looks nice. Use that to your advantage! If you have high-quality imagery on your website, anyone interested in purchasing your products will subconsciously view your business as an expert in your field. Case and point, Apple has gotten away with (over)charging their customers for more than a decade, and they can do that because they present their products in a very pretty way.  Sadly*, that is all it takes sometimes. (Or luckily* depending on your perspective.) Perceived value can go an incredibly long way. Clever marketing and high-quality ad material can take your business to a whole new level.

SEO

Search Engine Optimization – The process of maximizing the number of visitors to a particular website by ensuring that the site appears high on the list of results returned by a search engine.

There are many elements to SEO, one of which is images.

Optimized photos help more people find your website by performing better in the overall search results. This kind of content is more engaging for potential customers and keeps them on your site for longer, encouraging them to choose you over a competitor.

Versatile assets

“content is king.” Photos can be recycled again and again in a range of content.  Whether it’s building your brand on social media, (Facebook, Instagram, Linkedin, etc..), sharing them in blog posts and articles, or utilising them offline in marketing materials such as brochures and business cards. There is a long list of possibilities to enhance your marketing efforts with professional photography.

Knowledge

Getting the perspective of a creative outsider, in any field, is invaluable. Ask them questions, offer your opinions, and get as much out of the arrangement as you can. The images you use for your website, catalogues and point of sale (PoS) all go a long way in communicating who you are, what your business does, and what your fundamental values are. Professional photographers know a lot about the industry and can provide some useful insights.

Convenience

Camera phones make it easier than ever to capture a moment. But it still doesn’t compare to the equipment a professional has. Most importantly, the years of experience behind the camera make such a difference and cannot be overstated.
Doing photography yourself is doable but it does require a lot of time to complete all stages of production.

Conclusion

In conclusion, photography has the potential to take your business to the next level, if done right. It will show potential customers who you are and build trust with them before they even walk through the door. If you’ve been wondering how to enhance or grow your business then it’s time to hire a professional. If there are any subjects you would like me to write about, drop me an email and I’ll see what I can do!

Remember, vetting your photographer is so important! You want to make sure the individual in question has the right skill set, attitude, and understanding of your project before you move forward. I offer free creative consultations as an opportunity to do just that! If you have a project which requires a professional photographer, I encourage you to book a creative consultation.

High Altitude

Photography Extremes – High Altitude

This may be the start of a mini-series of blogs as it is a huge topic to discuss. There are many extreme conditions in which photography can take place – High altitude. High temperature, Low temperature, Underwater, Wilderness, desert etc. In this iteration, we will be discussing high altitude. There are a few locations where you may encounter high-altitude conditions: The most common of which is the mountains.

Atmosphere and altitude

First some quick facts about our atmosphere.

Earth’s atmosphere can be divided into four categories. (It goes without saying that atmospheres are far more complicated than these four sections but four is a number our little human brains can at least comprehend). They are:

The Troposphere

The lowest layer of Earth’s atmosphere. Nearly all weather conditions take place here and it accounts for 75% of Earth’s mass. This layer of the atmosphere extends upwards to 10kilometers above sea level.
NB: layers of the atmosphere actually differ in height depending on where you are on the planet, but for simplicities sake in this photography blog (yes I am aware this is supposed to be about photography) we will say 10km.

For some perspective, Mount Everest is roughly 8.9km. You may remember that heat rises, so why is the top of Everest so cold? That’s thanks to this guy –

The Stratosphere

The second layer to Earth’s atmosphere. This ranges from 10kilometeres to 50kilometeres. Commercial planes can fly up to 13km so it is safe to say, as a photographer, the MAX altitude you will have to deal with is the very bottom end of the Stratosphere. When people talk about climate change, this is the culprit. Inside the Stratosphere, around the 20km-30km mark, is the Polar Stratosphere (A.K.A Ozone Layer).

These two are the only two you have to be conscious of when it comes to high altitude photography.

Though if you’re interested the other two are the Mesosphere (50km-85km) and the Thermosphere (85km-690km).

BONUS FACT: Above the Thermosphere is the Exosphere (690km-10,000km). ‘Exo’ meaning outside.
BONUS BONUS FACT: The moon is roughly 400,000km away.

Hopefully, you found that as interesting as I did. But if you didn’t and you’re wondering “why on Earth did he say all that?”, my response would be: Firstly, nice pun. Secondly, it is the longwinded and pompous way of saying “the higher you get, the thinner the air is and the colder it gets”.

If you are not an experienced climber or mountain hiker, these factors are important to keep in mind at all times. In addition, mountains are a breeding ground for tough terrain so it would be worthwhile taking someone experienced with you.

Altitude training (training at high altitude), is a practice undertaken by some of the greatest athletes on the planet; including marathon runners, cyclists and Olympians. As mentioned above, a staggering 75% of the world’s mass is within the troposphere. Most of this mass is at sea level which means the higher you go the less dense the air becomes, which in turn makes it more difficult to breathe. As a result, you take in less oxygen with each breath, and consequently, each step requires that much more effort. The lesson to be learned here: You’ll need to be fit!

A quick piece of practical advice would be to put your camera strap on diagonally. This not only protects your camera if you fall, which is very possible given the terrain, but it also means your camera is ready at any moment for a picture. I would also highly recommend capturing BTS (behind the scenes), as it has many benefits which I will talk about in another post.

Technology

Altitude will affect your equipment as well as your body. For this reason, you should pack light and pack simple. Batteries wear out faster in the cold so make sure you have enough of them to last the experience. Other than that, a simple set-up: One camera, one to two lenses and a polarizer.

Granted, if you’re using batteries then you’ll be using a DSLR (Digital Single-Lens Reflex) camera.
This accompanied by the use of manual settings will be sure to bring out the best from your surroundings. Your lens(es) are likely to fog up so bring a camera wipe just in case. Let’s talk equipment.

Camera

I’d recommend the Canon EOS 5d mark iv with the following specifications

Sensor Resolution 30.4 Megapixels
Optical Sensor Type / Size CMOS / Approx. 36.0 X 24.0 mm
Field of view crop factor 1.0
Sensor dust reduction Yes
Sensor Features EOS Integrated Cleaning System
Image Processor DIGIC 6+
Image Recording Format JPEG, RAW, RAW+JPEG

and the following environmental parameters:

Min Operating Temperature 32°F/0°C
Max Operating Temperature 104°F/40°C
Humidity Range Operating 0-85%
Protection Dust-resistant, Waterproof

Lenses

A good multipurpose lens is the Canon EF 24-105mm f/4L IS USM. A wide-angle lens is always ideal when capturing the landscape. However, contrary to popular belief, I think a zoom lens will offer something unique to your photographs. Capturing the finer details on the mountain’s peak.

In addition to your lens, a polarizer will make a HUGE difference to your photos.

I would recommend the AntiGlare CPL filter from Moment.

Settings

The most important element in this environment is the depth of field. Your photo’s subject is likely to be the mountains themselves. You want aperture sitting at around f/9. Your shutter speed and ISO will vary depending on the style you’re after.

Shutter speed dictates the motion your camera captures in the image; the higher the shutter speed the less motion-captured and vice versa. Long exposure photography is exactly that, a slow shutter speed that captures a lot of movement.

ISO (International Organization of Standardization) is your sensor’s sensitivity to light. The term originated in the film when it was known as ‘film speed’ and ‘ASA’. The higher your ISO the higher your sensor’s sensitivity to light (the brighter your photo) and with that comes grain. On average you want to keep ISO under 1200. If your working on a DSLR you want your recording format to be RAW. This holds more information than JPEG and enables more freedom when editing.

There you are, high altitude photograph in a nutshell. This is the first of many posts on this website. The blogs will likely revolve around advice for photographers or those seeking photographers, stories and information all regarding photography. Please get in touch if you have any requests or ideas for future blog posts. I hope you found this useful and I look forward to hearing from you.

Best,

CK Morrison

Wildlife photography

Wildlife photography

Let’s start with a hypothetical. You’ve planned to do some wildlife photography and on safari hoping to photograph a lioness. It’s raining, there is thick overcast and you’ve had no luck finding any animals whatsoever. After hours of waiting you finally spot one, you take out your camera and just as you’re about to take a photo, the clouds open up and the sun shines down on the lioness’s face, then you press the button and the magic happens.

Some may say that is just an unpredictable phenomenon that leads you to get a good picture. A good point and no rational man, woman or child would argue that luck didn’t have something to do with it. However, there are elements to this equation you have control over.

The three most important things in photography are luck, patience and knowledge:

Patience


For wildlife photography the ability to wait. A good-natured tolerance of delay will prove a useful skill on any photoshoot. Some of the world’s best wildlife and architecture photographers have admirable amounts of longanimity and are capable of waiting hours for the right picture.

You will likely be spending a lot of time sitting/standing around, the best advice I received was to learn to be content with waiting. This composure will only be beneficial for you, your work and your life outside of photography. That being said, you can mitigate how long you have to wait with the right knowledge.

Knowledge

‘Knowledge is power.’

Knowledge is being aware of the information.

Power has 3 definitions:

  1. Physical strength.
  2. The storage of energy (i.e.: a battery).
  3. The ability to control.

We will focus on the latter. The more you know, the more you can control.

There are many factors you, the photographer, should consider and research before embarking on a wildlife shoot. Knowledge in these areas will positively impact your work and your efficiency:

  • Your objective
  • Your prey
  • The location
  • The weather
  • Your equipment

Your objective

Setting an objective is always critical when it comes to efficiency. If you don’t know what you are shooting for then by definition you are aimless. What do you want to photograph? What are you trying to do? What are you trying to say? Whether this is for a client or just a personal project, what are the objectives? Create a purpose for the photoshoot, something to accomplish. It will be more rewarding both intrinsically and extrinsically.

Your prey

Wildlife photography is, to all intents and purposes, the humane version of Game Hunting. These are wild animals you want to find and shoot, but instead of a gun, you have a camera.

In this example, you have decided to capture a lioness (with your camera). This is your prey, so learn about it. Daily habits, sleeping schedules, eating habits.. etc. This will narrow down where and when you are likely to find a lioness. For example, lions living in hot and arid environments will rest in the shade when the sun is at it’s highest to conserve water and energy, so your chances of finding lions roaming the plains are slim.

The location

You know your prey, you know where you’re shooting, now you need to focus on logistics and terrain.

Logistics: What time do you want to get there? How long will it take to get there? Is there parking? Should you pack food the night before? Be prepared for it.

Terrain: If your location is in the mountains, you should take hiking boots. If it’s a hot desert, pack extra water and sunscreen. A cold desert, bring extra layers! Etc. Here you should prepare for your journey and pack things you may need. With that being said… try to pack light.

The weather

The weather is your friend. Regardless of the weather, you can get some stunning pictures of wildlife, which is one of the things that attracts photographers to wildlife photography. Rain especially. When it’s raining, the overcast means soft light is evenly spread across your subject, and the rain itself wets the fur, creating a more detailed and stylised look. I’d highly recommend checking the weather reports a week prior to the shoot so you can prep for the right weather, then check again the day before as the forecast will be more accurate.

Camera equipment

Pack light, pack simple. Use natural light whenever photographing wildlife so there is no need to pack lighting gear. A single body and a couple of lenses will suffice. Things to bring:

  • Camera
  • Lenses
  • Motion sensor (For trapping)
  • Housing (For trapping)
  • Flashes (For trapping)
  • Clothing

A brief note on traps

Motion-activated Camera traps are an effective tool and capture lit portraits, they are a good alternative. You can carefully compose the scene and even control how the light spills onto the subject before you even take the picture. Gear needed for camera traps:

Camera and lens

The main challenge is getting close to the animals. For this, I use telephoto lenses. However, this can limit your creative options. Alternatively, 24-100mm on a full-frame camera provides a wide range of useful perspectives. You’ll be shooting ‘stopped down’.

Motion sensor

In terms of commercially available equipment, you’re limited to active infrared (AIR) or passive infrared (PIR). AIR sensors create a narrow beam between two units (similar to a garage door sensor), once your subject passes through it, the camera takes a photo. Whereas, PIR sensors are one-piece units that detect changes in heat across a broad area.

Housing

You’ll be leaving the camera outside, exposed to nature, bugs, animals & theft. To protect your camera. Minimum you’ll want a rain cover. Full protection you’ll want a hard-bodied housing. Contraptions offer simple portable shelter, and TRL provides custom-made fully protected housing.

Flashes. These may be required when trapping as the shot may be underexposed.

Luck

Defined as ‘success or failure apparently brought by chance rather than through one’s own actions. In other words, you can’t control it, so don’t worry about it.

I hope this information has been practically usefully and inspired you to go take some photos! If you have any ideas regarding future blogs please feel free to shoot me an email.

Happy hunting.